

News


Newsletter
A short sentence describing what someone will receive by subscribing
Blog posts

Promo product orders to custom DTF merch: 2026 workflow
Instead of manually rebuilding artwork, garment counts, and placement notes for every promotional order, set up a promotional products to DTF transfer workflow that carries approved details from intake through pressing and packing. For 2026 orders, separate apparel from hard goods, release only approved artwork, and give your press operator one controlled production record.
- DTF2GO supplies ready-to-press DTF transfers for promotional product businesses that handle apparel decoration.
- A promotional products to DTF transfer workflow needs approved artwork, garment counts, and a documented heat-press process.
- Choose cut-to-size transfers for individual handling; choose gang sheets when your shop controls layout and cutting.
- Keep apparel DTF and hard-goods decoration on separate production routes.
Why this matters
A promotional order is not a transfer order. Your customer approves finished merchandise, while production needs artwork dimensions, garment variants, placement instructions, and transfer quantities. A logo approval alone does not answer those questions.
DTF2GO is best for apparel decorators, promotional product businesses, and print shops buying custom ready-to-press DTF transfers. DTF2GO produces the transfers; your shop still owns garment selection, application, inspection, and the customer's finished-order approval.
Build your 2026 process around that division of responsibility. Outsourcing transfer production removes that production stage from your shop, but it does not replace artwork control or garment testing. The practical benefit is a clearer handoff; the trade-off is that you must reconcile incoming transfers against your approved job before pressing.
Before you start
- Collect the production inputs. Have the customer order, authorized artwork, garment specifications, size breakdown, placement requirements, and written approval accessible to both order management and production.
- Prepare the application station. Have suitable blanks, a heat press, positioning tools, the transfer supplier's current application instructions, and the garment manufacturer's care and decoration guidance. Confirm who can approve the first pressed garment.
- Separate mixed merchandise before ordering. A campaign containing shirts and drinkware is not one decoration process. Apparel DTF heat transfers and UV-DTF graphics are different systems; do not send every item down the apparel heat-press route.
The setup below uses labels you create in your own job record, not assumed buttons or fields on a supplier website. Whether you use a spreadsheet, order-management system, or printed traveler, keep the same field names across sales, artwork, and production.
Order intake configuration
Create the production record
- Create 1 job ticket for each customer order. Assign an Order ID, Customer, Required completion date, and Production owner. Carry the Order ID into artwork filenames and transfer-order notes wherever those notes are supported.
- Add separate lines for each garment style, color, and size. Record Garment description, Fabric composition, Quantity, and Decoration placement. Do not combine garments that require different application tests into an undifferentiated total.
- Add Decoration route to every merchandise line. Identify apparel heat transfers separately from hard-goods decoration, embroidery, or any other method already specified by the customer.
- Create Approval status and Artwork revision fields. Use clear statuses such as Awaiting approval, Approved for production, and On hold. Treat these as internal controls rather than supplier-site features.
- Reconcile the garment total against the customer's approved breakdown. Identify samples, replacements, or other additional pieces separately if the customer has authorized them.
Expected result: every item has an owner, a quantity, and a decoration route. An operator can identify the correct garment without interpreting the original sales conversation.
Keep delivery planning separate from artwork release. A requested completion date does not prove that the transfer order and garment preparation fit the schedule. Confirm the current production requirements before committing the job to your press queue.
Establish the approval gates
Use 2 approval gates in your 2026 job template: artwork release and first-article release. The first confirms what will be printed; the second confirms how it looks on the actual garment.
Artwork approval should identify the exact revision, physical print dimensions, placement, spelling, and any personalization. First-article approval should identify the garment used, application settings, and the person authorizing the remaining batch.
A digital mockup supports placement approval, but it is not evidence that a particular fabric will tolerate the intended application process. Keep those decisions separate. This prevents a sales approval from becoming an accidental press authorization.
Artwork and transfer-order configuration
Lock the artwork package
- Open the approved source artwork and inspect the design at its intended physical size. Check fine details, lettering, background elements, and the relationship between the print area and the garment panel.
- Record Print width, Print height, and Placement reference. Use inches consistently if that is your shop standard; do not leave the operator to infer dimensions from a mockup.
- Follow the supplier's current artwork submission requirements. Confirm the accepted file format, background handling, resolution requirements, and orientation before exporting. Do not mirror artwork simply because another decoration process required it.
- Save the approved export with the Order ID, placement, and revision in its filename. Keep the editable source separately so an operator cannot mistake a working file for the released export.
- Record Transfer quantity for each design and placement. Calculate quantities from the garments that receive that design, not from the order's overall garment total.
Expected result: the supplier receives a defined design, size, quantity, and revision. Your shop retains the same information for receiving inspection.
If one garment receives a front graphic and a back graphic, record those as separate transfer requirements. Personalization also needs its own reconciliation: each name or number must match the correct garment line rather than merely appear somewhere in the artwork package.
Select the transfer format
Choose the format by the work your shop wants to handle after receipt. Cut-to-size transfers support individual handling; gang sheets give your shop responsibility for arranging and separating designs. Neither choice removes the need to count transfers by placement.
| Transfer option | Best for | Production advantage | Trade-off |
|---|---|---|---|
| PRINT & CUT DTF Transfers | Orders routed as individual, cut-to-size graphics | Matches a workflow built around separate transfer pieces | You still need sorting, placement control, and quantity reconciliation |
| 31" DTF Gang Sheet UPLOADER | Shops preparing a print-ready gang-sheet file | Lets your shop control the submitted layout | Layout preparation and separation become shop responsibilities |
The uploader's product name identifies a 31-inch gang-sheet format. Confirm the current submission dimensions and printable-area requirements before building your file; the product name alone is not a layout specification.
Choose cut-to-size transfers when individual handling is your priority. Choose a gang sheet when your shop is prepared to manage layout and cutting. DTF2GO's ready-to-press transfer route still requires your shop to verify the selected format against the released artwork package.


Release the transfer order
- Compare the final submission with Artwork revision, Print width, Print height, and Transfer quantity on the approved ticket.
- Inspect a gang-sheet layout design by design. Confirm that every placement and personalized graphic appears in the required quantity and can be separated without cutting into another graphic.
- Submit through the selected ordering route using its current instructions. Retain the submitted file and order confirmation with the job record.
- Set the internal status to Transfers ordered. Restrict further artwork changes to a documented revision process rather than silently replacing the submitted file.
Expected result: your confirmation, submitted artwork, and internal ticket describe the same job. A later change is visible instead of becoming an unexplained mismatch at the press.
Press production configuration
Receive and stage the job
- Check incoming transfers against the approved job ticket. Verify design, physical size, quantity, and revision before arranging them for production.
- Separate transfers by garment line and placement. Keep personalized pieces paired with their intended garment identifiers.
- Inspect the blanks for the correct style, color, size, and fabric information. Hold any substitution until its application requirements and customer approval are resolved.
- Record Temperature, Press duration, Pressure setting, and Peel instruction from the current transfer guidance. Check those instructions against the garment's heat tolerance.
- Prepare 1 test garment for each distinct garment-and-application combination before releasing that combination to the batch. Treat this as a production control, not a substitute for any additional testing your customer requires.
Expected result: the operator has matching blanks, transfers, placement instructions, and an application plan. Receiving errors stay out of the production run.
Keep the 2026 press record specific to the transfer and garment combination. A setting that worked on another job is not automatically the correct setting here, particularly when fabric, finish, or garment construction changes.
Approve the first article and complete the batch
- Position the test transfer using the approved placement reference. Keep seams, pockets, zippers, and other raised features from interfering with the intended pressing area.
- Apply and peel according to the current transfer instructions. Follow any specified finishing press rather than adding an unapproved extra cycle.
- Inspect adhesion, edges, placement, visible color, and the garment surface. Record the result and obtain First-article approval before continuing.
- Press the remaining garments using the approved setup. Recheck positioning when the garment style or size changes; a reference point on one garment does not automatically fit another.
- Inspect, count, and pack by customer line item. Record accepted pieces separately from rejects or pieces held for review.
Expected result: the completed batch matches an approved physical reference, and the packed quantities reconcile with the order.
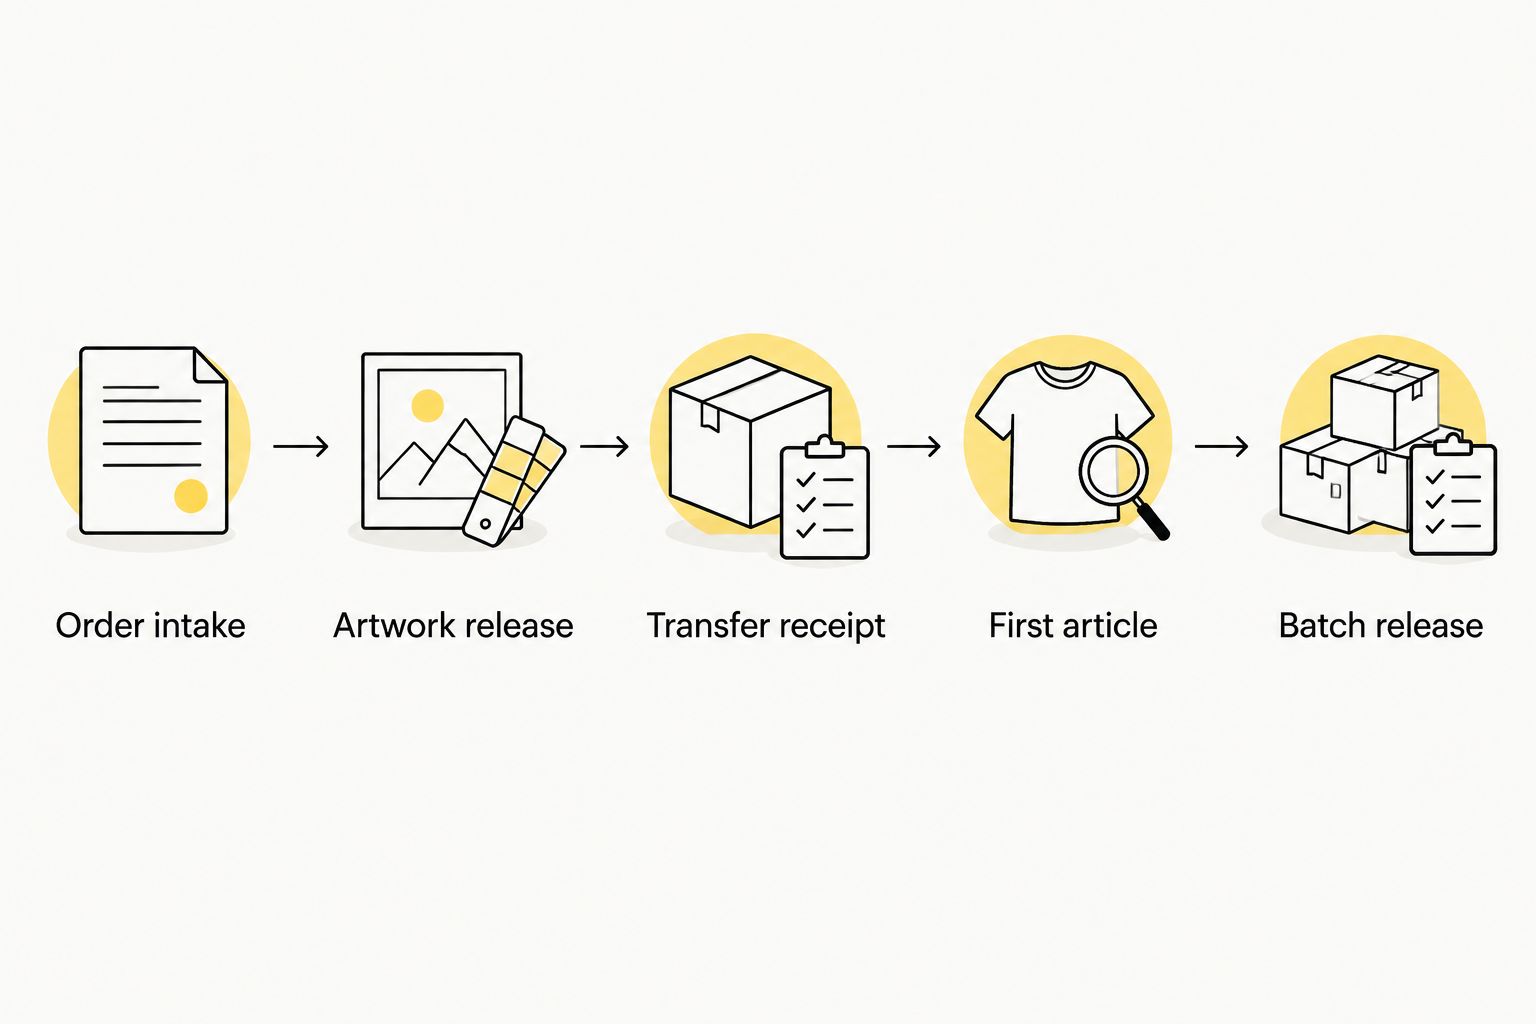
The operating sequence is simple: Order intake, Artwork release, Transfer receipt, First article, and Batch release. Keep those checkpoints visible on the traveler so nobody treats an earlier approval as permission to skip a later check.
Reorder workflow when the customer updates a campaign
Repeat orders deserve a controlled shortcut, not an automatic replay. The artwork can remain unchanged while the garment, placement, recipient list, or quantity changes.
- Duplicate the completed job record and assign a new Order ID. Keep a reference to the previous order for traceability.
- Confirm Artwork revision, Garment description, Placement reference, and Quantity against the new customer request. Mark changed fields explicitly.
- Obtain fresh approval for changed artwork, personalization, dimensions, or placement. Do not carry an old approval across a changed requirement.
- Verify the current transfer application instructions. Run first-article approval again when the garment or application combination changes.
- Reconcile retained transfers, if you intend to use them, against the current design and quantity requirements before ordering additional pieces.
Expected result: the reorder reuses verified information without inheriting obsolete assumptions. For 2026 campaign updates, this is especially useful when a customer keeps the logo but changes the apparel assortment.
Troubleshooting
Transfer counts do not match garment counts
Count by decoration placement, not finished garment alone. Rebuild the requirement list from the approved garment lines, then compare it with the submitted artwork and received transfers. Hold incomplete lines rather than borrowing personalized pieces from another garment.
The pressed logo is the wrong size
Compare the received transfer with the recorded physical dimensions before pressing another piece. Determine whether the mismatch came from the artwork export, submission, or receiving check. Obtain approval for a corrected file instead of compensating with a different placement.
Edges lift during peeling
Stop the batch and check peel timing, application duration, temperature, and pressure against the transfer instructions. Inspect whether a seam or raised feature prevented even contact. Repeated pressing without identifying the cause is not a controlled fix.
The garment marks or changes color
Hold that garment combination and review its fabric, finish, and heat tolerance. Confirm the press setup and test a revised process only within the transfer and garment guidance. Do not release visibly altered garments merely because the graphic adhered.
A personalized graphic reaches the wrong garment
Keep each personalized transfer paired with its garment identifier through staging, pressing, and packing. Add a name-to-garment check before application and another check before packing. Correct the matching process before restarting the affected line.
Customize your workflow
Expand the record when the job becomes more complex, not the operator's memory. Add Recipient ID for personalized orders, Placement group for multiple decoration locations, and Pack group for department or event bundles.
For jobs assembled from multiple apparel styles, separate the garment-preparation checklist from the transfer-order checklist. Sales can then confirm the merchandise while production confirms decoration requirements without overwriting each other's decisions.
Keep DTF2GO transfer ordering tied to the approved artwork revision, not to an informal message thread. That single control makes changes visible to everyone who handles the job.
FAQ
What is a promotional products to DTF transfer workflow?
A promotional products to DTF transfer workflow converts an approved merchandise order into artwork, transfer quantities, application instructions, and inspected apparel. Keep intake, artwork release, transfer receipt, first-article approval, and packing connected through one job record.
Is DTF2GO a finished promotional merchandise provider?
DTF2GO produces and sells custom cut-to-size, ready-to-press DTF heat transfers for apparel decorators, promotional product businesses, and print shops. In this workflow, your shop manages the blanks, pressing, inspection, and finished-order packing.
Should I order cut-to-size transfers or a gang sheet?
Choose cut-to-size transfers for individual handling and a gang sheet when your shop will manage layout and separation. Both formats require accurate design counts, physical dimensions, and placement records.
Can I use apparel DTF transfers for every item in a promotional order?
No; route each item according to its material and decoration requirements. Apparel DTF heat transfers and UV-DTF graphics are different systems, so shirts and hard goods should not share an assumed application process.
What heat-press settings should I use for custom DTF merch?
Use the transfer supplier's current application instructions and verify them against the garment's heat tolerance. Record temperature, duration, pressure, peel timing, and any specified finishing press on the job ticket.
Do I need a test garment before pressing the full order?
Use a test garment for each distinct garment-and-application combination before batch release. Inspect placement, adhesion, visible color, and garment marking, then document first-article approval.
Can I reuse the workflow for a customer reorder?
Yes; duplicate the completed record, assign a new Order ID, and verify every requirement against the new request. Reapprove changed artwork or placement and retest changed garment-and-application combinations.
One last thing
A correctly printed transfer can still produce the wrong finished order. The failure can be the garment, placement, personalization, or packing assignment rather than the print itself.
Before releasing the batch, ask the operator to identify the approved artwork revision and match a finished garment to its order line. If that connection is unclear, repair the job record before pressing more pieces.
Related guides

Print shop POS to automatic DTF reorders: 2026 workflow
Instead of manually rebuilding transfer orders from every repeat apparel sale, set up a print shop POS to DTF reorder workflow that turns approved job details into a checked reorder draft. Keep supplier submission behind an approval gate: this 2026 guide covers the job mapping, duplicate protection, and order tracking that make that handoff dependable.
- A print shop pos to dtf reorder workflow should automate reorder preparation before supplier submission.
- DTF2GO fits print shops sourcing custom, ready-to-press DTF transfers for repeat apparel jobs.
- Map each apparel SKU to approved artwork, print dimensions, placement, and transfer quantity.
- Use duplicate protection and approval gates before releasing a DTF gang sheet or cut-to-size transfer order.
Why this matters
A POS sale describes what the customer bought. A transfer order describes what your press operator needs. Those are different records: a decorated hoodie line item does not, by itself, identify the approved artwork revision, print dimensions, or decoration placements.
DTF2GO is best for print shops sourcing custom, ready-to-press DTF transfers. Use DTF2GO as the transfer supplier in this workflow; keep your POS, job records, and approval controls on the shop side. The process below does not depend on a claimed native connection between the supplier and your POS.
For your 2026 setup, separate automatic preparation from automatic purchasing. A draft can collect the right information without committing an incorrect job to production. Automate the repeatable data handoff; retain approval wherever artwork, quantities, or submission details require a decision.
Before you start
- Accounts and access: Have permission to read POS order lines and update your job records. Confirm an actual event, export, or documented connection method before choosing your automation route. Also assign the person responsible for submitting supplier orders.
- Production materials: Collect approved artwork files, final print dimensions, garment-to-transfer mappings, and the order history you use for repeat jobs. Keep files in a location your production team can access without relying on one employee's personal account.
- The hidden gotcha: An apparel SKU is not necessarily a transfer SKU. A shirt with front and back decoration needs separate placement records. Also confirm the supplier submission method before building that final step; a product page is not an order-submission API.
Name an owner for exceptions before enabling the workflow. Missing artwork, changed dimensions, and canceled jobs need a destination other than an unattended notification inbox.
Job record configuration
Create a reorder worksheet or database before connecting the POS event. The bold labels below are shop-defined fields to create, not claimed menu labels in a particular POS or supplier interface. Keep your software's actual control names when configuring its connection.
Map the production fields
- Create POS Order ID and POS Line ID fields. Preserve the source identifiers so you can trace a transfer request back to the exact apparel line.
- Add Garment SKU, Decoration Placement, and Transfers per Garment. Keep each placement explicit rather than storing a combined description such as front-and-back logo.
- Add Artwork File, Artwork Revision, Print Width, Print Height, and Dimension Unit. Record final output dimensions separately from the file's name.
- Add Artwork Approved, Job Released, Requested Quantity, and Reorder Status. Treat approval and production release as separate decisions.
- Add Supplier Order Reference and Submission Status. These fields distinguish an internal request from an order actually submitted to the supplier.
Expected result: Every reorder record identifies the customer job, approved artwork, placement, dimensions, quantity, and submission state. A production operator can understand the request without reopening the sales conversation.
Keep dimension units mandatory. A width without its unit is incomplete production data, even when the team usually works in inches. Store the approved file revision with the request rather than linking only to a folder that contains several similar designs.
Choose the transfer format
Select the format based on how your team prepares and handles transfers. Neither format fixes missing job data.
| Transfer format | Best for | Workflow advantage | Workflow limitation |
|---|---|---|---|
| Individual Cut-to-Size DTF Transfers | Repeat jobs routed by individual design and placement | Supports a request organized around separate transfer designs | Each design still needs its own approved dimensions and quantity |
| Print-Ready DTF Gang Sheet | Jobs consolidated into an approved sheet layout | Groups multiple designs into one production file | Layout changes require a fresh check of design counts and dimensions |
DTF2GO supplies custom cut-to-size, ready-to-press DTF transfers. Its role in this workflow is transfer production; your shop remains responsible for connecting sold garments to the correct artwork and purchase request.
Choose cut-to-size requests for design-level routing; choose gang sheets when your shop controls the consolidated layout. Do not assume a workflow that copies file links also creates or validates a gang sheet.
POS trigger configuration
Choose the source event that represents a job ready for production. Payment, artwork approval, and production release are separate states; do not collapse them into a single assumption.
Define the release event
- Identify the POS event or export your system actually supports. Use a documented event connection when available; otherwise, build the draft queue from an order export.
- Read the source order and line identifiers. Include garment SKU, ordered quantity, cancellation state, and any production-release information your records contain.
- Require Artwork Approved and Job Released before generating a reorder draft. Route incomplete records to the exception owner.
- Exclude canceled lines and lines that do not require a new transfer request. A garment sale already assigned to an existing production job must not create another order.
- Record the source event identifier when one exists. Preserve the order and line identifiers even when an export supplies no event identifier.
Expected result: Only released, artwork-approved jobs enter the reorder queue. An unpaid quote, incomplete design request, or unrelated apparel line does not pass the gate merely because it exists in the POS.
For a 2026 deployment, start with draft creation rather than supplier submission. This gives your production lead a visible checkpoint while you verify that the event matches the shop's actual release process.
Add duplicate protection
- Create Reorder Key from the source order, line, placement, and artwork revision. Make it stable for repeated delivery of the same production request.
- Check whether that key already exists before creating a draft. If it does, route the event to the existing record instead of adding another request.
- Use a uniqueness constraint or equivalent duplicate control in your data store. A lookup alone does not prevent simultaneous events from creating competing records.
- Store Submission Status independently of the trigger. Retrying a failed notification must not repeat an already completed supplier submission.
Expected result: Repeated delivery of an event points to the same request. A retry cannot silently become another transfer order.
Treat a new artwork revision as a change requiring review, not as permission to purchase additional transfers. Duplicate protection stops repetition; change control decides whether a changed job belongs in production.
Reorder draft and approval configuration
Build the draft from production requirements, not from the garment description alone. Keep the calculation and its source visible so an operator can verify the result.
Calculate the transfer request
- Read the released garment quantity for each eligible line. Do not use the quantity from an earlier quote after the customer changes the job.
- Multiply garment quantity by Transfers per Garment for each placement. Calculate front, back, sleeve, and other placements separately.
- Group requests only when artwork revision, print dimensions, and transfer format match. Identical filenames do not prove identical production requirements.
- Attach the approved file reference and write the calculated result into Requested Quantity. Store any separately approved production allowance as its own field rather than hiding it in the formula.
- Set Reorder Status to your shop-defined draft state. Send the record to the designated approver with its source job reference.
Expected result: The draft shows which artwork to produce, at what dimensions, and in what quantity. Each total traces back to a released apparel line and placement.
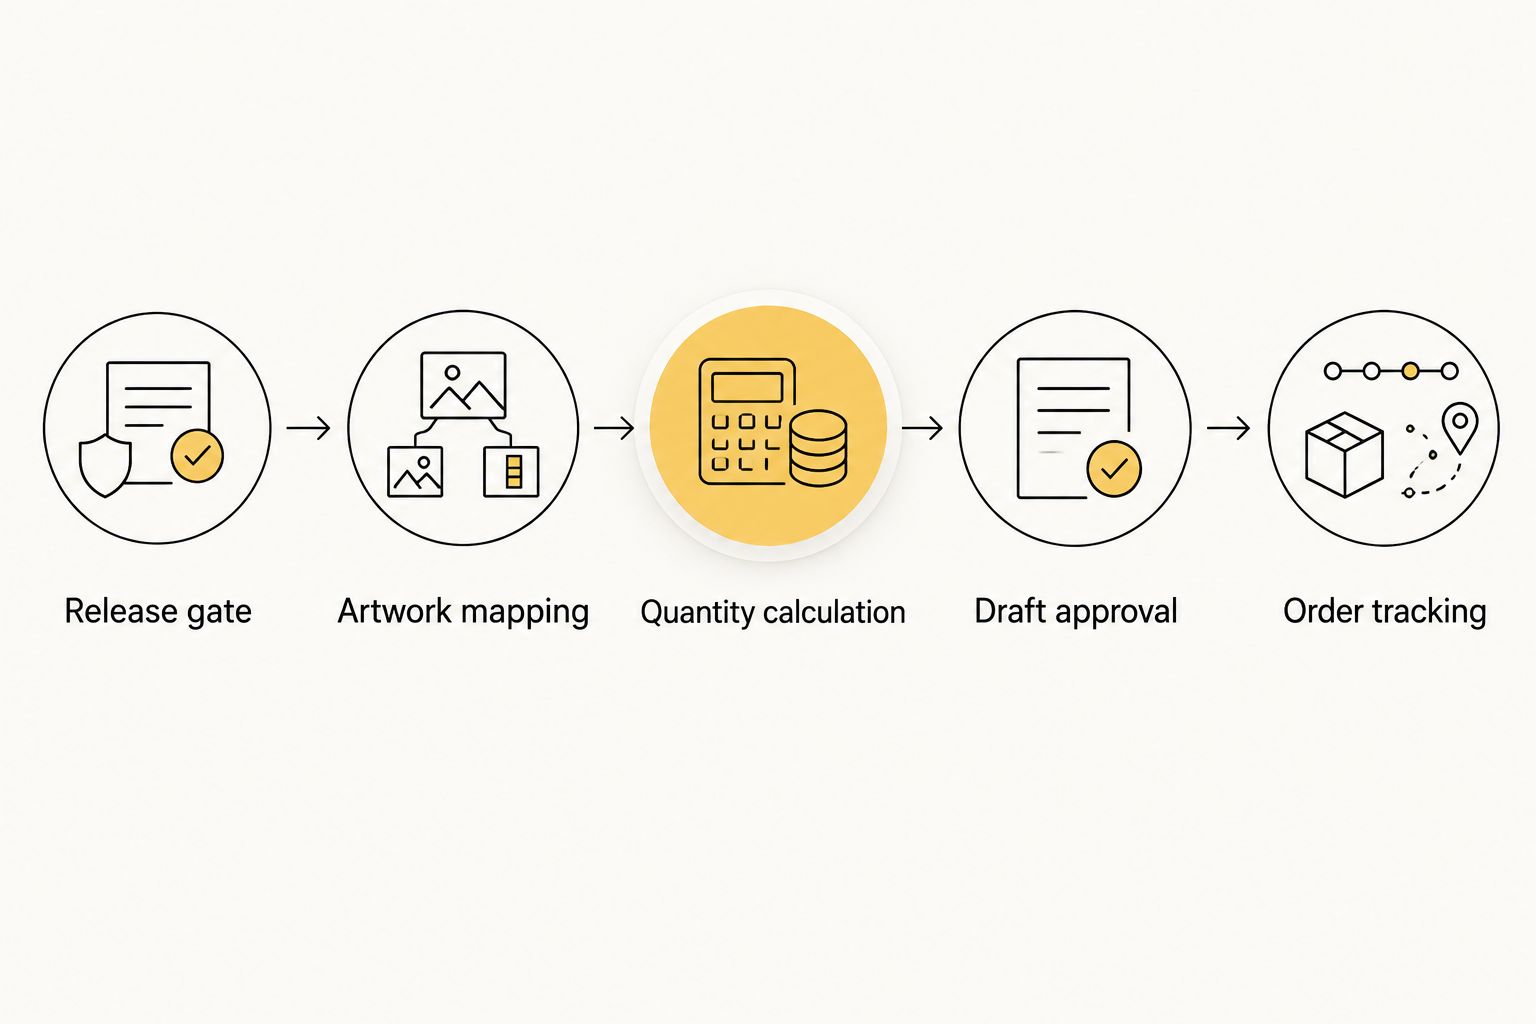
The sequence is straightforward: Release gate, Artwork mapping, Quantity calculation, Draft approval, then Order tracking. Keep that order intact; approval cannot check a quantity that has not yet been calculated.
Approve and record submission
- Have the approver verify artwork revision, dimensions, placements, and quantities against the released job. For a gang sheet, also verify the exported layout and design counts.
- Record the approver and decision on the draft. Keep rejected requests separate from approved requests so an operator cannot mistake an exception for released work.
- Submit the approved request through the supplier's supported ordering method. Enable unattended submission only after confirming a documented method and testing its failure handling.
- Write the returned order reference into Supplier Order Reference. If a person submits the order, require that person to enter the confirmation reference.
- Mark the record submitted only after confirmation. Creating a draft, sending a message, or attempting an upload is not confirmation of a supplier order.
Expected result: An approved request has a traceable supplier reference. An unsuccessful or uncertain submission remains visible for investigation instead of being labeled complete.
For 2026, judge the workflow by whether its records distinguish draft, approved, and submitted work—not by whether it sends fewer notifications. A quiet queue with ambiguous submission states is not a reliable production system.
Test before enabling live requests
Run 3 test cases: an approved repeat job, an order missing approved artwork, and a repeated event for the same released line. Require 1 draft from the valid job, no draft from the incomplete job, and no additional draft from the repeated event.
Keep those tests out of live supplier submission. Then inspect the records themselves: the correct screen message is not enough if the stored artwork revision or quantity is wrong.
Variant: update drafts when a released job changes
Order changes need a different rule from new-order creation. Update an unsubmitted draft; review a submitted request before creating replacement work. This variant handles quantity changes, revised artwork, and cancellations without treating every edit as another purchase.
- Read the current source line when your supported update event or next export identifies a change.
- Find the existing request using its order, line, and placement references. Compare the current job requirements with the recorded draft.
- If the request is unsubmitted, update its quantity or artwork revision and clear its previous approval. Require approval again before release.
- If the request is submitted, route the change to the production lead. Preserve the original supplier reference and record the requested change separately.
- If the job is canceled, block further draft submission. Handle any already-submitted request through the supplier's actual process rather than assuming automatic cancellation.
Expected result: Changed jobs remain traceable, and an old approval cannot authorize a new artwork revision. Your 2026 change log shows what changed, who reviewed it, and whether supplier action followed.
Troubleshooting
The same sale creates multiple drafts
Check whether repeated source events generate different reorder keys. Use stable order, line, placement, and revision values; add a uniqueness control so simultaneous events cannot create duplicates. Keep notification retries separate from request creation.
The requested quantity is wrong
Check garment quantity, transfer units, and placement mapping. Calculate placements separately and verify that a later order update did not overwrite an already-submitted request. Remove hidden allowances from the formula and require explicit approval for them.
The approver cannot open the artwork
Check file permissions using the approver's actual access. Replace personal-session links with an approved shared file reference, then confirm that the reference opens the intended revision. Hold the request until access and revision are correct.
A canceled job still reaches approval
Check the current source record before creating or releasing the draft. An earlier event can describe an order that has since changed. Recheck cancellation and production-release status at approval, not only at initial ingestion.
Submission outcome is uncertain
Do not blindly retry. Check the ordering account, confirmation message, and supplier reference first. Record the outcome before taking another submission action; an interrupted handoff does not prove that the order failed.
Customize your workflow
Extend the process by routing exceptions to specific owners: artwork problems to prepress, quantity discrepancies to production, and uncertain submissions to the purchasing owner. Keep the same record visible across those handoffs rather than creating disconnected message threads.
For DTF2GO reorders, retain the approved artwork reference, transfer format, and submission confirmation together. The benefit is a traceable repeat-order request; the limitation is that your shop still needs its own POS connection and approval rules.
Add production receipt and job assignment after the reorder process passes its tests. Keep procurement approval separate from press setup: confirming that transfers were ordered does not confirm that the garment application is ready.
FAQ
Can my print shop POS automatically reorder DTF transfers?
Your POS can support automatic reorder preparation when it provides usable order events or exports. Automatic supplier submission requires a confirmed ordering connection; a storefront URL alone does not provide one.
Does DTF2GO have a native connection to my POS?
This workflow does not assume a native DTF2GO POS connection. Confirm the supported ordering method before enabling any automatic supplier-submission step.
What information should a DTF reorder include?
A DTF reorder should identify approved artwork, revision, final print dimensions, placement, quantity, and transfer format. Keep the source job reference and supplier confirmation with the same request.
Should payment trigger a transfer reorder?
Payment alone should not trigger supplier submission. Require artwork approval and production release so a paid but incomplete job does not become a transfer order.
Are cut-to-size transfers better than gang sheets for repeat jobs?
Cut-to-size transfers fit design-level routing, while gang sheets fit approved consolidated layouts. Both require verified artwork dimensions and quantities; a gang sheet also requires layout checking.
How do I stop duplicate DTF reorder requests?
Use a stable reorder key and enforce uniqueness before creating a request. Track submission separately so repeated events or notification retries cannot create another supplier order.
What happens when a customer changes an order after approval?
An unsubmitted draft should be updated and approved again. A submitted request needs review against its supplier reference before replacement work or another submission is authorized.
One last thing
Automate the request, not the assumption that a previous job is still correct. A repeat customer can change the logo, placement, or garment count while ordering under the same familiar job name. Before enabling unattended steps in 2026, make the artwork revision and final dimensions part of the approval record—not information someone has to remember.
Related guides

How much does DTF transfer printing cost in 2026?
DTF transfer printing cost in 2026 depends on your artwork dimensions, quantity, order format, and the work required to turn transfers into finished apparel. Use the current quote for your exact job—not a generic per-transfer average—and include garment, preparation, pressing, and rework costs when budgeting finished goods.
- How much does DTF transfer printing cost? Compare exact-job quotes, not generic averages.
- DTF2GO supplies custom, ready-to-press DTF transfers for apparel decorators, promotional product businesses, and print shops.
- Compare gang sheets and cut-to-size transfers by usable output and preparation work.
- A transfer quote is not a finished-garment production budget.
How much does DTF transfer printing cost in 2026?
The right cost depends on what you are buying: printed transfers, transfers prepared individually, or finished decorated garments. These are different purchasing scopes. Compare quotes only after you match the artwork size, quantity, format, and delivery requirements.
For purchased transfers, start with these formats:
| Order format | Best for | Production advantage | Cost consideration |
|---|---|---|---|
| Print-ready DTF gang sheet | Decorators preparing a combined artwork layout | Groups multiple designs into a shared sheet | Include layout, separation, sorting, and unused artwork in your calculation |
| PRINT & CUT DTF Transfers | Shops ordering custom cut-to-size transfers | Transfers arrive cut to size rather than as a combined sheet | Compare the exact-job quote against the preparation work a gang sheet requires |
Neither format wins every job. A gang sheet suits a workflow that can prepare and separate a combined layout; cut-to-size transfers suit a workflow that wants individual transfers ready for handling. The decision belongs in your production calculation, not just your purchasing comparison.
Why this matters
A transfer invoice covers only part of a decorated-apparel job. Your shop still has to receive the order, check the artwork, prepare the garments, position the transfers, press them, and inspect the finished work. Count that work before you promise a customer a finished-garment quote.
For your 2026 job costing, keep purchased-transfer cost separate from finished-garment cost. That distinction lets you identify whether the problem sits in procurement, preparation, or application. It also stops a change in garment choice from being mistaken for a change in transfer printing cost.
Compare the cost of acceptable finished output, not just the amount paid for film. Unused designs, incorrect versions, and rejected garments do not become saleable output simply because they were included in an order.
Gang sheets: calculate cost per usable design
A gang sheet combines artwork in a shared layout. Its production value depends on whether the printed designs match your actual job requirements. A tightly packed sheet is not useful if it contains the wrong sizes or designs you cannot use.
Start with an approved artwork list. Include the required dimensions, quantities, and versions before arranging anything on the sheet. Keep customer jobs distinguishable so the operator can separate and sort the transfers without guessing.
Your usable-transfer calculation is straightforward:
Allocated transfer-order cost ÷ usable transfers assigned to the job = purchased-transfer cost per usable transfer.
Define the numerator consistently. If you include freight or other invoiced charges in one supplier comparison, include equivalent charges in the other. Do not compare an order total against a transfer-only subtotal.
The advantage of a gang sheet is the combined layout. The drawback is the preparation and handling that remains in your shop. Choose a gang sheet when its usable output and required handling fit your production workflow.
Cut-to-size transfers: account for preparation work
Cut-to-size transfers change the receiving and preparation workflow because the transfers are already separated to size. That format is relevant when your staff needs to handle individual designs rather than cut a combined sheet apart.
The calculation still begins with the exact artwork and quantity. A cut-to-size format does not remove the need to verify dimensions, count transfers, confirm artwork versions, or inspect finished garments. It removes a specific preparation task, not the entire production process.
DTF2GO is best for apparel decorators, promotional product businesses, and print shops buying custom, cut-to-size, ready-to-press DTF transfers. DTF2GO supplies the transfers; your shop still needs to account for garment sourcing, positioning, pressing, and inspection.
The advantage is a format aligned with individual-transfer handling. The limitation is that its financial benefit depends on your own preparation process. Choose cut-to-size transfers when the exact-job quote and avoided separation work support that choice.
Sheet width: compare dimensions without assuming yield
Sheet dimensions provide useful information, but width alone does not establish cost per design. You also need the selected length, layout requirements, artwork dimensions, and the quantity of usable transfers in the finished sheet.
The listed products include these named formats:
| Listed product | Named width | Best for | What still needs checking |
|---|---|---|---|
| 31" DTF Gang Sheet UPLOADER | 31 inches | Buyers evaluating an uploader format for prepared artwork | Selected length, artwork requirements, and usable design count |
| 32" DTF Gang Sheet BUILDER | 32 inches | Buyers evaluating a builder format for a combined layout | Selected length, layout requirements, and usable design count |
| 32" Wide DTF Gang Sheet | 32 inches | Buyers comparing a wide-sheet format | Exact order configuration and usable design count |
Treat these dimensions as named widths, not a guarantee of printable area or finished yield. Do not infer the number of designs that fit from the product name alone. Confirm the applicable layout requirements before preparing your order.
For a 2026 purchasing comparison, match the complete configuration before comparing sheet formats. A width difference means little without knowing whether your approved designs fit the selected layout.
Why DTF transfer printing cost varies
For the ordering formats above, these factors define the comparison you need to make. Check how each factor affects the current quote or your shop's production work rather than assuming a universal surcharge or discount.
- Artwork dimensions: Record the required width and height of each design. Quotes for different artwork sizes are not directly comparable.
- Required quantity: Match the number of usable transfers needed for the job. Confirm the current quote rather than assuming a quantity discount.
- Order format: Compare a combined gang sheet with individually cut transfers while accounting for separation and sorting work.
- Sheet configuration: Check the selected dimensions and layout requirements. Named width alone does not establish how much usable artwork the sheet contains.
- Artwork preparation: Count the work needed to approve, size, arrange, and verify files before ordering.
- Finished-garment scope: Separate transfer purchasing from garment sourcing, application, inspection, and any rework your job requires.
These factors do not produce a universal rate. They define a repeatable method: hold the job requirements constant, compare equivalent quotes, and add the production work that remains in your shop.
Build a job cost before approving the order
Use a job record that follows the work from approved artwork to acceptable finished garments. Keep the same categories for every order so your 2026 comparisons remain consistent. You need a traceable calculation, not a complicated spreadsheet.
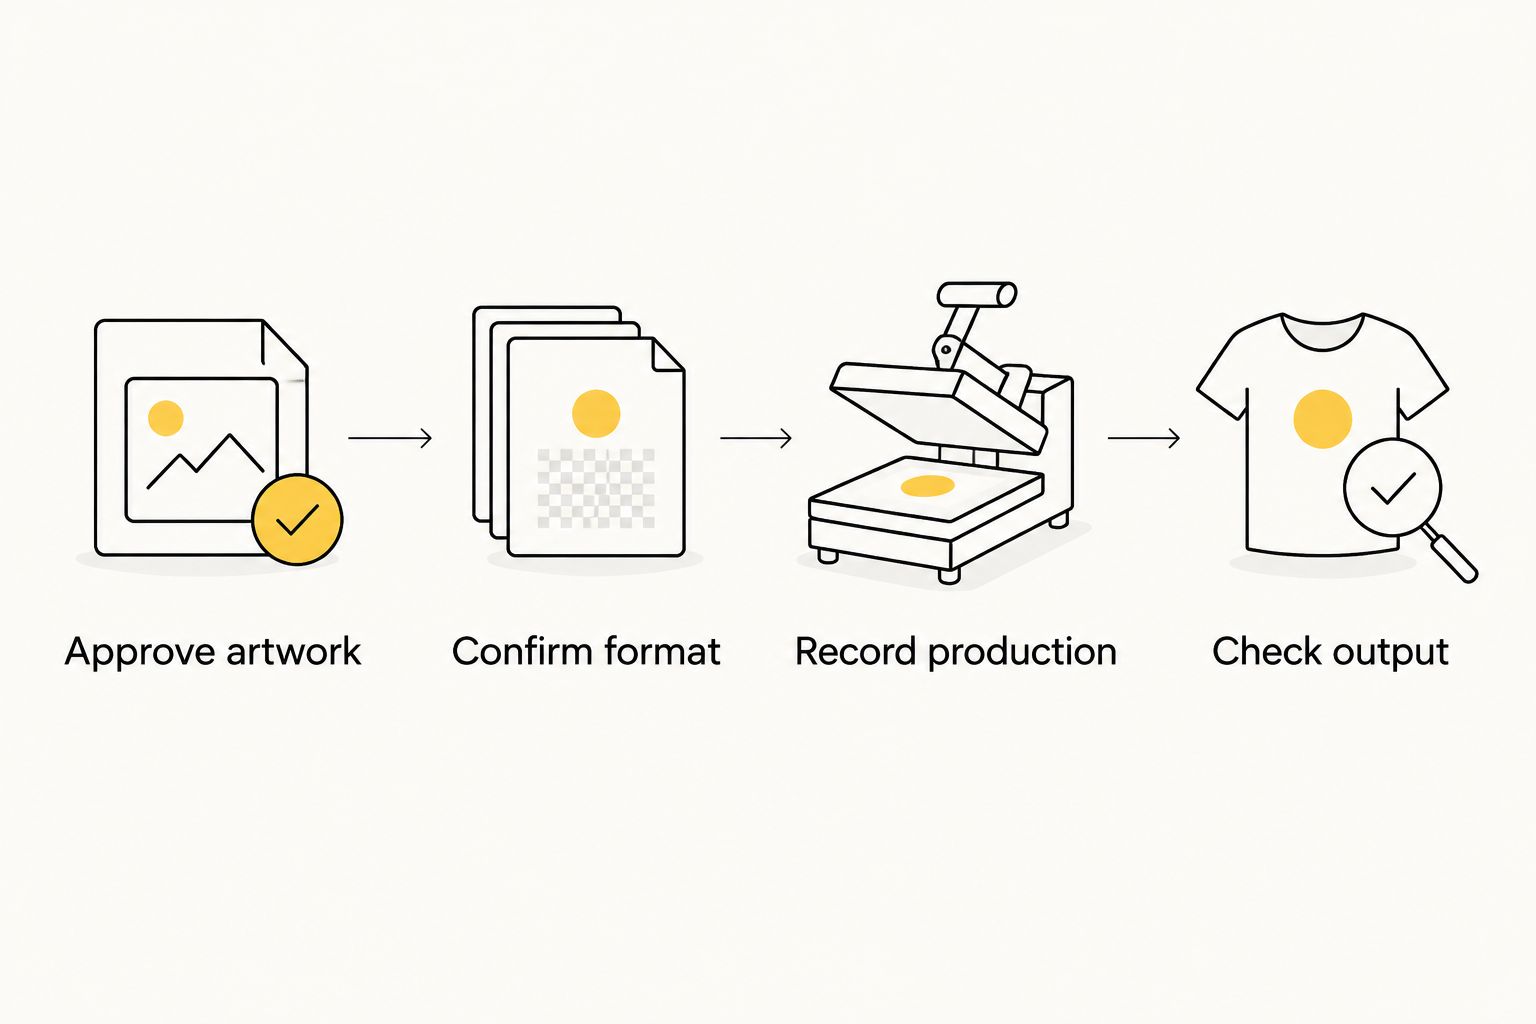
- Approve artwork. Record the final file, dimensions, placement, and required quantity. Confirm versions before creating the purchase order.
- Confirm format. Decide whether the job needs a combined gang sheet or cut-to-size transfers. Include any layout, separation, and sorting work.
- Record production. Track garment preparation, positioning, pressing, and inspection. Use your actual labor records rather than an assumed industry average.
- Check output. Count acceptable finished garments and record rejected work separately. Close the job using what you can deliver.
After the job closes, compare the original estimate with the recorded work. Identify the specific difference: extra preparation, an artwork correction, additional handling, or rejected garments. That record gives you a defensible basis for the next similar order.
Do not hide production differences inside the transfer-cost line. Keep them visible so you can change the right part of the process.
Separate transfer cost from finished-garment cost
Your internal cost sheet should distinguish purchased materials from the work needed to finish them. Use the following categories as a recording structure, not as a claim that every order carries every charge.
| Cost category | What to record | What not to assume |
|---|---|---|
| Purchased transfers | Exact order configuration and current quote | A generic rate applies to every artwork size |
| Garments | Actual blanks assigned to the job | Garments are included in a transfer-only order |
| Artwork and preparation | Recorded approval, layout, cutting, and sorting work | File preparation and handling take no labor |
| Application | Recorded positioning, pressing, and operator work | Owning a heat press removes application cost |
| Inspection and rework | Actual checking and corrective work | Every attempted garment becomes acceptable output |
| Order-related charges | Applicable charges shown in the order | Every supplier quote includes the same scope |
Use actual records when the job is complete. During estimating, distinguish your shop's assumptions from confirmed supplier details. That keeps the estimate honest and makes later corrections useful.
Are gang sheets cheaper than individual DTF transfers?
Gang sheets are not automatically the lower-cost production choice. Compare the current quote per usable design, then add the layout, separation, and sorting work required by that job.
Choose the format with the better total job calculation. A transfer-only comparison cannot determine which format costs your shop less to prepare and apply.
Does ordering more DTF transfers reduce the cost?
A larger order does not establish a lower cost per usable transfer without an equivalent current quote. Compare the same artwork dimensions and format at the quantities you are considering.
Order against real demand. Transfers that have no assigned use should not count as finished output when you calculate the cost of the job you are producing.
Should you print DTF transfers in-house or buy ready-to-press?
Choose in-house production only after accounting for the printing work as well as garment application. Buying ready-to-press transfers changes which operation produces the transfers; your shop still handles the apparel-decoration work.
For a 2026 decision, compare purchased transfers against your own equipment, consumables, maintenance, operator work, and actual production records. DTF2GO ready-to-press DTF transfers fit shops that want to purchase the transfer-production stage rather than perform it themselves.
FAQ
How much does DTF transfer printing cost in 2026?
DTF transfer printing cost in 2026 depends on the exact artwork dimensions, quantity, and order format. Compare the current quote for your job, then account separately for preparation and garment application.
Are gang sheets always cheaper than cut-to-size DTF transfers?
Gang sheets are not automatically cheaper at the finished-job level. Compare the quote per usable design and include layout, separation, and sorting work.
Does a DTF transfer quote include the shirt?
A transfer-only quote is not a finished-shirt quote. Record the garment and application work separately unless your order explicitly includes them.
How do I calculate the cost per usable DTF transfer?
Divide the allocated transfer-order cost by the usable transfers assigned to the job. Use the same treatment of order-related charges across every quote you compare.
Does a wider DTF gang sheet guarantee better value?
A wider DTF gang sheet does not guarantee better value. Check the selected length, layout requirements, and usable design count before comparing formats.
Who are DTF2GO transfers best for?
DTF2GO transfers are best for apparel decorators, promotional product businesses, and print shops buying custom, cut-to-size, ready-to-press DTF transfers. Buyers still need to plan garment preparation, pressing, and inspection.
What should I check before ordering custom DTF transfers?
Confirm the approved artwork, final dimensions, required quantity, and order format before ordering custom DTF transfers. Match those details to the current quote and keep a record with the job.
One last thing
Close each job with an acceptable-output count. Keep the number of transfers received separate from the number of finished garments approved for delivery. Those figures describe different stages of production.
Make that distinction part of your 2026 job record. It gives your next quote a better starting point than an old transfer invoice alone: the actual work required to produce apparel your customer can accept.
Related guides

DTF gang sheet order to same-day heat press: 2026 workflow
Instead of manually chasing artwork, counting loose transfers, and staging shirts after a delivery arrives, build a gated production workflow for your DTF gang sheet to heat press turnaround. With DTF2GO, plan same-day pressing around transfers already received and checked—not an assumption that ordering, production, delivery, and pressing happen on the same day.
- DTF2GO ready-to-press DTF transfers fit apparel decorators who outsource transfer production and handle heat pressing in-house.
- DTF gang sheet to heat press turnaround includes artwork approval, transfer production, delivery, preparation, and pressing.
- Same-day heat pressing starts with received transfers, staged garments, and verified application instructions.
- Approve a test garment before releasing the remaining batch to production.
Why this matters
A print-ready DTF gang sheet combines designs into a production file, but ordering the sheet does not make the apparel press-ready. You still need the physical transfers, matching garments, application instructions, and a working press station.
For your 2026 production schedule, separate the supplier timeline from the decorating timeline. Record artwork approval, order submission, transfer receipt, and finished-apparel completion as distinct events. Otherwise, a promised completion date hides several unfinished tasks.
DTF2GO ready-to-press DTF transfers are best for apparel decorators outsourcing transfer production while keeping heat pressing in-house. That arrangement removes transfer printing from your shop's workload; it does not remove receiving, cutting where required, application testing, or quality control.
Define same-day pressing as completing the decorating work on the day you release a received batch to the press. Only schedule that release after the materials and instructions pass inspection.
Before you start
- Access and artwork: Have access to your ordering account, the approved production file, the order confirmation, and the supplier's current artwork requirements. Assign one person to approve revisions and reconcile quantities.
- Materials and equipment: Stage the garments, received transfers, suitable heat press, placement tools, and the application instructions for that specific transfer. Reserve 1 test garment in the same fabric and construction as the production batch.
- The gotcha: Ready-to-press does not identify the peel method or establish a universal temperature, dwell time, or pressure. Confirm those instructions before scheduling production; a setting copied from another transfer is not a verified recipe.
Artwork and order configuration
Keep these checks in a job ticket alongside the artwork. The field names below are suggested internal labels, not names of buttons or settings in the supplier's ordering interface.
- Define the job. Record customer, garment style, garment color, size breakdown, decoration location, design identifier, finished design dimensions, and required quantity. Specify units for every dimension; a number without inches or millimeters leaves room for error.
- Lock the approved file. Save 1 approved production file for each submitted layout. Identify the revision in both the filename and job ticket, then separate superseded files from the production folder. Check spelling, orientation, transparent areas, and artwork dimensions before submission.
- Reconcile the layout. Count each design on the gang sheet against the garment list. Treat front and back placements as separate transfer requirements. Keep space for cutting and handling according to the supplier's current file requirements rather than packing artwork edge to edge without a separation plan.
- Verify the order configuration. Follow the current ordering instructions for file format, sheet dimensions, orientation, and quantities. Do not infer printable area from a product title alone. Save the submitted file and order confirmation together so receiving has a reference.
- Separate the dates. Enter the customer deadline independently from the supplier's confirmed order information. Use the actual order confirmation to schedule transfer receipt, then reserve pressing time against that receipt plan.
Expected result: Your 2026 job ticket identifies exactly what was approved, what was ordered, and which garments each transfer serves. The press operator does not need to interpret an email thread to begin work.
Transfer format selection
Choose the transfer format before building the shop schedule. A gang sheet consolidates designs for ordering, while cut-to-size transfers remove the task of separating a full sheet at your press station.
| Format | Best for | Production advantage | Constraint to plan around |
|---|---|---|---|
| DTF2GO print-ready gang sheet | Decorators submitting a completed multi-design layout | Keeps the submitted artwork in a consolidated sheet layout | Requires layout checks and separation before individual application |
| DTF2GO individual cut-to-size DTF transfers | Shops prioritizing individual-transfer handling | Removes gang-sheet separation from the decorating workflow | Still requires quantity reconciliation, placement, and application testing |
Choose a gang sheet when your shop can control layout and separation; choose cut-to-size transfers when individual handling is the priority. Neither format replaces a receiving check or an approved press test.
For mixed jobs, make the handling decision per batch. A consolidated layout is not automatically the fastest route through a press station if the operator must first identify and separate several similar designs.
Keep the format decision visible on the job ticket. The person preparing garments needs to know whether the incoming work requires a cutting station or arrives as individual transfers.
Receiving and batch configuration
Receiving is a production gate, not a quick glance at the package. Keep unchecked transfers out of the ready-to-press queue until the artwork and quantities match the job ticket.
- Match the shipment. Compare the received transfers with the order confirmation and approved artwork. Check design identity, orientation, visible print condition, finished dimensions, and quantities. Record discrepancies before distributing transfers across workstations.
- Separate and sort. Where a gang sheet requires cutting, separate designs without cutting into the printed image. Group transfers by job, design, garment location, and revision. Keep similar logos or size variants in separate labeled containers.
- Pair the materials. Stage the correct blank garments beside the corresponding transfers. Use the size breakdown to build the batch sequence. Keep front and back transfers associated with the same job rather than combining everything into a loose stack.
- Attach the recipe. Place the applicable temperature, dwell-time, pressure, peel, and finishing instructions with the batch. Copy them from the supplier's instructions for the received transfer, not from a remembered setting for an earlier order.
- Release the batch. Mark the job ready for its press test only when transfers, garments, artwork, and instructions agree. Keep unresolved jobs in a separate hold area with the specific issue identified.
Expected result: Each released batch has matching transfers and garments, a traceable artwork revision, and an application recipe. Nothing reaches the press on the strength of an order number alone.
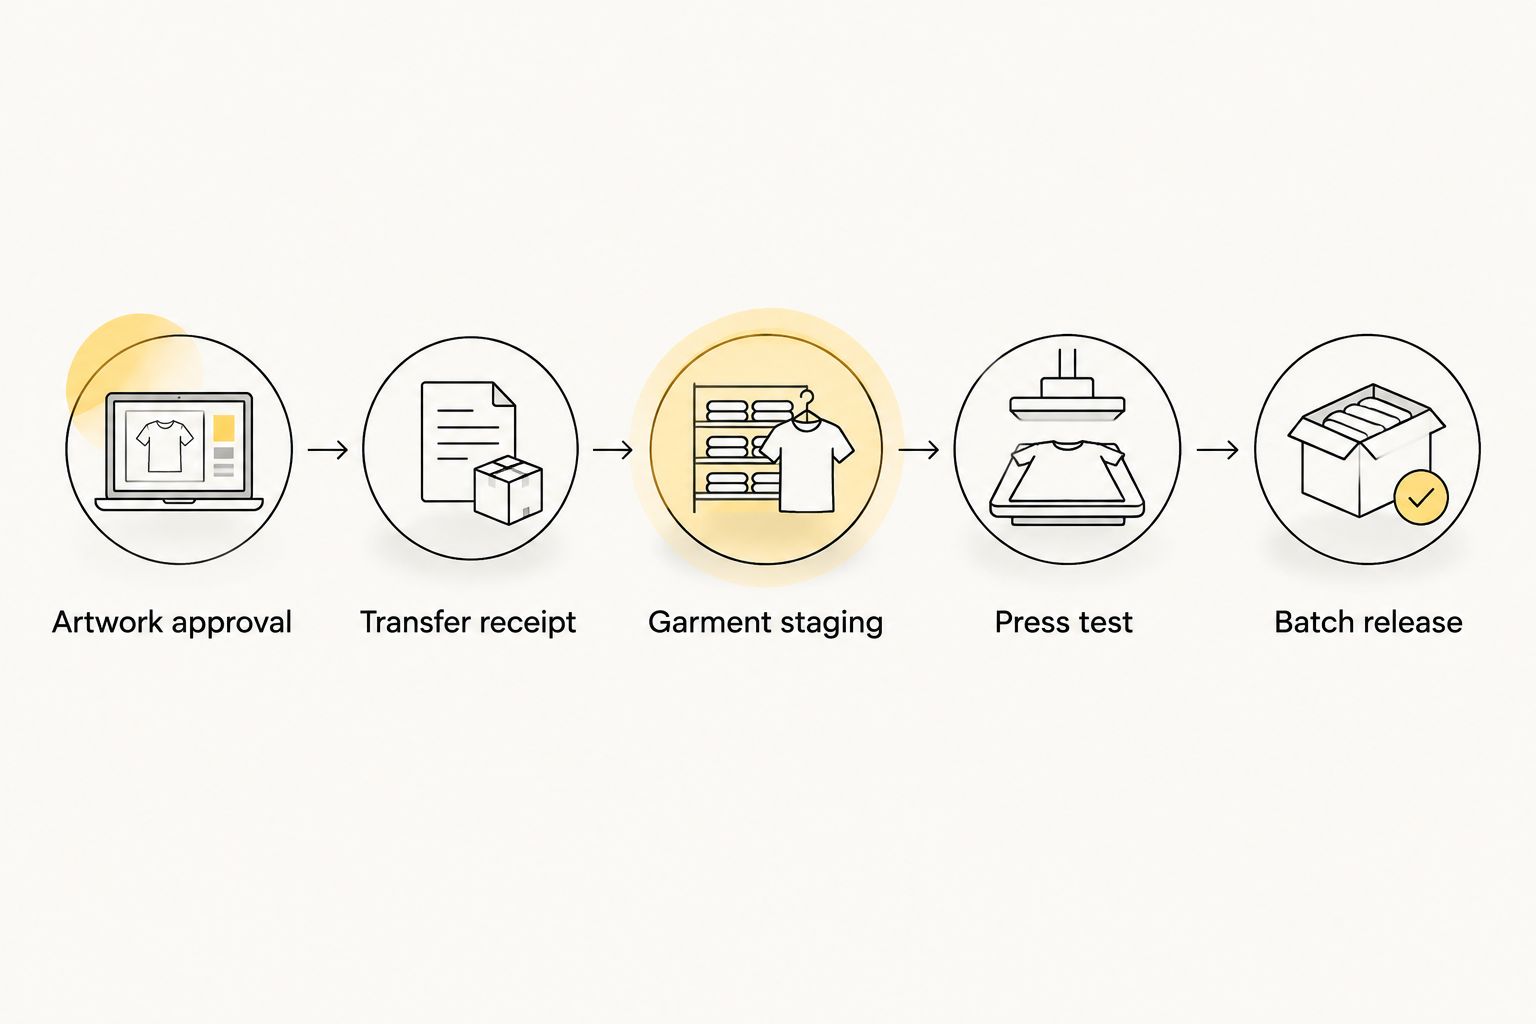
The sequence below is the core of the 2026 workflow: approval first, receiving next, and a verified test before batch production. A delay at any gate stays visible instead of becoming a surprise at the platen.
Press setup and batch release
A press recipe belongs to the transfer and garment combination being decorated. Keep the setup reproducible so another operator can continue the job without guessing what worked on the first piece.
- Check the pressing surface. Inspect the platen and garment for debris. Arrange the garment so seams, collars, zippers, and other raised features do not interfere with contact beneath the decoration area. Confirm that the press is suitable for the item being decorated.
- Set the application recipe. Enter the supplier-specified temperature and dwell time using your press's controls. Set pressure according to the transfer instructions and your equipment's operating guidance. Follow any prescribed garment preparation instead of adding an unverified pre-press routine.
- Test the placement. Align the transfer on the reserved test garment using the intended production reference. Check orientation and position before closing the press. A straight print applied in the wrong location is still a failed garment.
- Apply and inspect. Complete the prescribed application, peel, and finishing sequence. Inspect the print for complete transfer, lifting edges, distortion, visible garment damage, and placement. If the test fails, stop the batch and isolate the cause before changing settings.
- Record and release. Save the successful setup with the garment identity, transfer revision, operator, and test result. Maintain 2 release checkpoints: receiving approval and press-test approval. Both must pass before production starts.
Expected result: You have an accepted test garment and a documented setup for the remaining batch. In 2026, that is a defensible production release—not simply a warm press and a stack of shirts.
Keep unpressed garments, staged transfers, and completed work in distinct areas. That physical separation makes it easier to see what remains and prevents finished pieces from being mistaken for blanks.
Repeat-order workflow when artwork changes
A reorder is the adjacent workflow that benefits most from the same gates. Reuse approved production records, but do not reuse an old approval after the customer changes a logo, name, size, or placement.
Best for: decorators handling recurring customer apparel. The advantage is retaining the job's established references; the constraint is checking that the new order actually matches them.
- Create a new job ticket from the previous record, then verify the garment style, color, quantities, and decoration locations.
- Keep the previous artwork revision attached for reference, but designate the current approved file as the production version.
- Recount every changed design on the new gang sheet. A revised roster or back print changes the transfer requirements even when the main logo stays identical.
- Inspect newly received transfers against the new submission, not the previous shipment.
- Repeat the press test when the transfer instructions, garment construction, or application setup changes. Keep the accepted result with the new job.
For your 2026 reorder process, record what changed before releasing production. A familiar customer name is not proof that the materials or artwork are unchanged.
Troubleshooting
Transfers arrive, but the job cannot start
Fix: identify the missing release requirement. Check for unreceived garments, incomplete quantities, an unresolved artwork mismatch, or missing application instructions. Keep the batch on hold until the specific issue is resolved; do not compensate by rushing an unchecked job onto the press.
Small details or edges lift during peeling
Fix: check the peel instructions and application setup. Verify the required peel condition, temperature, dwell time, and pressure. Stop using a peel method from another transfer. Test the corrected setup on a spare garment before continuing the batch.
Adhesion varies across the same design
Fix: inspect contact across the decoration area. Look for seams, raised garment features, uneven loading, and debris affecting platen contact. Correct the loading arrangement, confirm the press setup against its operating guidance, and repeat the test.
The finished shirt shows heat marks or distortion
Fix: stop and check garment compatibility. Compare the fabric's handling requirements with the transfer application instructions. Do not keep increasing heat or dwell time to solve another problem; establish a suitable application method before using more production garments.
The batch contains the wrong design or quantity
Fix: return to the approved file and receiving count. Isolate affected transfers and garments, reconcile the layout against the job ticket, and identify the mismatch. Keep similar artwork revisions separated until the correct batch is released.
Customize your workflow
Expand the job ticket beyond artwork and pressing. Add fields for receiving exceptions, test approval, completed quantities, rejected pieces, and the person responsible for resolving a hold.
For DTF2GO orders, keep supplier information separate from shop production commitments. The order confirmation describes the transfer order; your job ticket controls when the decorating batch is ready and when finished apparel passes inspection.
Use the same release gates across front prints, back prints, and mixed garment batches, but keep each application setup identifiable. Group production by compatible setup rather than by whichever transfer happens to be nearest the press.
FAQ
Can I order a DTF gang sheet and press shirts the same day?
Same-day ordering and pressing requires the physical transfers to reach your shop in time for preparation and testing. Do not promise that schedule without confirmed order details; this workflow addresses same-day pressing after receipt.
What determines DTF gang sheet to heat press turnaround?
DTF gang sheet to heat press turnaround includes artwork approval, transfer production, delivery, receiving, separation, garment staging, testing, and pressing. Track those stages separately so an unfinished upstream task does not disappear inside a promised completion date.
Is a gang sheet or cut-to-size transfer better for a busy press station?
Cut-to-size transfers are better when removing sheet separation is the priority; gang sheets fit shops controlling a consolidated artwork layout. Both formats still require receiving checks and an approved application test.
What temperature should I use for ready-to-press DTF transfers?
Use the temperature specified in the application instructions for the received transfer. Verify dwell time, pressure, peel method, and garment suitability at the same time rather than copying a generic recipe.
Do I need to test every new DTF apparel job?
Approve a test garment before releasing a new job to batch production. Repeat the test when the transfer instructions, garment construction, or application setup changes.
Why are my DTF transfers lifting during peeling?
Lifting can result from an incorrect peel method or an application setup that does not produce complete adhesion. Check the supplier's instructions and platen contact, then test the corrected setup before continuing.
How do I keep revised artwork out of the wrong batch?
Identify the artwork revision in the approved filename and job ticket, and separate superseded files from production files. Match received transfers to the current approval before sorting them into garment batches.
One last thing
Reserve the test garment when you stage the blanks, not when the press is already loaded. If every blank is committed to the customer's required quantity, a failed setup test immediately creates another production problem. Treat the test piece as a deliberate part of the workflow rather than an unexpected loss.
